Linux
Top 50 Basic Commands of Linux to get you started [2025]
Let’s Learn Basic Commands of Linux/Unix with Practical Examples :
If you are looking for a comprehensive guide to get you started on basic commands of Linux, then you have just landed on the right page! Linux is a widely used and robust free and opensource operating system used by developers, system administrators and web hosting companies to mention a few. Learning Linux is one of the essentials skills you need to have as climb up the IT career ladder.
In this guide, we have put together some of the basic commands of Linux that you need to have at your fingertips at any given time. Let’s now dive in and have a glance at the basic commands of Linux.
Basic commands of Linux
As we get started with the basic commands of Linux, we are going to categorize the basic commands of Linux into different categories as shown:
- File commands
- System information commands
- File permissions/ownership
- Network commands
- Process management
- Commands for compressing and decompressing
- Commands for searching files
- Other useful commands
Let’s now dive deep and have a look at the commands in each category
File commands
These are commands that you will use to perform basic file operations. Here’s an overview of the basic file commands:
1. pwd command
The pwd command is one of the most commonly used commands. It displays the full name of the absolute path or current working directory. It begins with a forward slash ( / ) with the root directory as a reference. When you launch the terminal or login in as a regular user, your path is usually /home/username as shown
|
1 |
$ pwd |

2. ls command
The ls command, short for list, is a command used for listing the contents of a directory. It lists all the files and directories contained inside the directory. Its basic usage is shown below
|
1 |
$ ls /path/to/directory |
For example, to check the contents of the current directory, run:
|
1 |
$ ls |

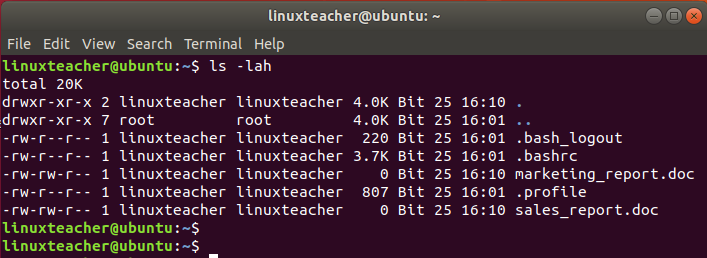
Additionally, you can use the -l option to view file permissions which we shall later talk about in this guide.
|
1 |
$ ls -l |

Also, you can use the -a parameter to reveal hidden files and -h to print the file and directory sizes in a human-readable format.
|
1 |
$ ls -lah |
3. Touch command
The touch command is used for creating new files. All you have to do it type the command followed by the file name. For example:
|
1 |
$ touch filename |
You can also create multiple files as shown:
|
1 |
$ touch filename1 filename2 |

4. cd command
Short for change directory, the cd command allows you to change from your current directory to another. For example, you can navigate from your home directory to another directory using the syntax below
|
1 |
$ cd /path/to/directory |
In the example below, we have navigated to the /var/run directory. As always, you can confirm your absolute path by running the pwd command

5. cp command
The cp command is used for copying files. It takes two arguments, the source of the file and the destination of the file
|
1 |
$ cp /source/of/file /destination/of/file |
For example, to copy the file ‘sales_report.doc‘ from the current directory to the /reports/sales/2019/ path, run the command:
|
1 |
$ cp sales_report.doc report/sales/2019 |

To copy a directory recursively (alongside all its contents), use the -R option followed by the directory name.
|
1 |
$ cp -R directory name |
For example, to copy the reports directory to the /tmp directory, run:
|
1 |
$ cp -R reports /tmp |

6. mv command
The mv command can be used in the following ways:
- Moving files from one location to another. Just like the cp command, this takes two arguments, the source of the file and the destination
|
1 |
$ mv /source/of/the/file /destination/of/the/file |
You can move several files at a go as shown in the example below. Here. I’m moving 2 files: ‘marketing_report.doc and ‘sales_report.doc‘ in the current working directory to a directory called ‘reports’
|
1 |
$ mv marketing_report.doc sales_report.doc reports/ |

- Renaming files
To rename a file using the mv command, the file path i.e source and destination has to be the same In the example below, we have renamed greetings.txt file to hello.txt
|
1 |
$ mv greetings.txt hello.txt |

7. cat command
The cat command can be used in a variety of ways.
- It can be used to display contents of a file as shown
|
1 |
$ cat filename |

- It can be used to input text into a file. To achieve this, type the cat command followed by ( > ) greater than sign and the name of the file. Next, type the text and once done, press CTRL + D to write the changes to the file.

8. mkdir command
The mkdir, short for make directory, is a command used for creating a new directory. The syntax is shown below:
|
1 |
$ mkdir directory |
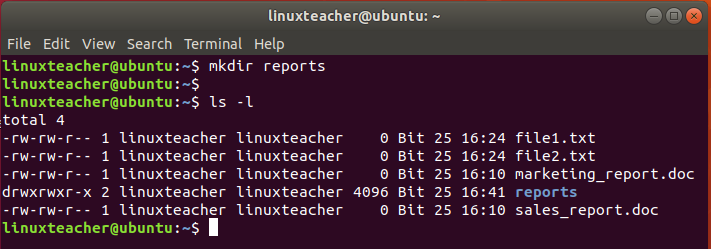
For example, to create a directory called ‘reports’ run the command:
|
1 |
$ mkdir reports |
To create a directory inside another directory in a hierarchical order, use the -p option as shown
|
1 |
$ mkdir -p directory/sub-directory |
For example, let’s imagine we want to create another directory inside the ‘reports‘ directory called ‘sales’. Inside the ‘sales‘ directory, let’s also assume we want to create another directory called ‘2019‘ To create those 2 directories in one command, simply run:
|
1 |
$ mkdir -p reports/sales/2019 |

9. rmdir / rm command
The rmdir command, short for Remove directory, deletes an empty directory. To remove an empty directory, simply specify the directory name after the command:
|
1 |
$ rmdir directory_name |
The rm command is used for deleting files and non-empty directories. To delete a non-empty directory, use the command together with the -R option.
|
1 |
$ rm -R directory |

To delete a file(s) define the file name after the rm command as shown:
|
1 |
$ rm filename_1 filename_2 |

10. file command
The file command is used for displaying the type of file content that you have in a file. For example, to determine the type of a file run
|
1 |
$ file filename |
Check out a few examples below:

In the first example, we can see we have ASCII text in the ‘hello.txt‘ file and a tar archive format in the second file.
System information commands
Sometimes, you may want to retrieve some information regarding your Linux system such as the hostname, load average, available disk space, and RAM. Let’s have a peek at some of those commands:
1. uptime command
Uptime command displays how long the system has been up, and the time it was turned on. Additionally, It also reveals currently logged in users and load average. To check all those parameters, simply type in the command as shown.
|
1 |
$ uptime |

2. uname command
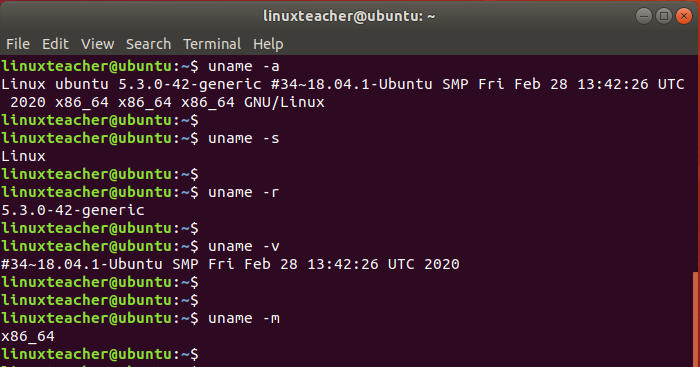
The uname is a command that reports the basic system’s information such as kernel name, kernel version, kernel release date, system’s architecture and underlying operating system.
By default, the command displays the operating system
|
1 |
$ uname |

uname takes other arguments as shown
- -a Displays all the system’s information
- -s Displays the kernel name
- -r Displays the kernel’s version
- -v Displays the kernel’s release date
- -m print’s the system’s hardware architecture
3. hostname / hostnamectl command
If you want to check your system’s hostname, simple use the hostname command as shown:
|
1 |
$ hostname |

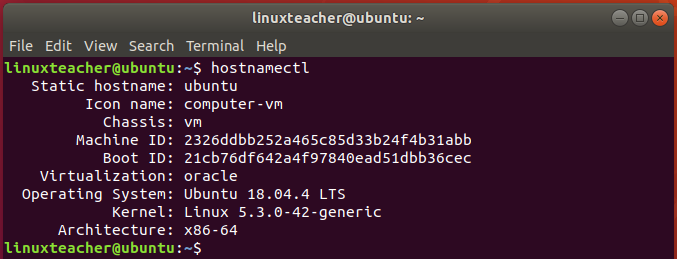
To print our additional information such as Machine ID, boot ID, kernel version, operating system and architecture use the hostnamectl command.
|
1 |
$ hostnamectl |
4. date command
The date command simply prints out the date and time of your Linux system.
|
1 |
$ date |

5. cal command
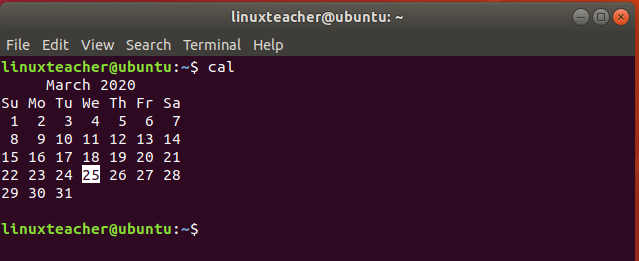
The cal command prints out the calendar of a specific month or the whole year. Without any arguments, the cal command prints out the current month and date.
|
1 |
$ cal |
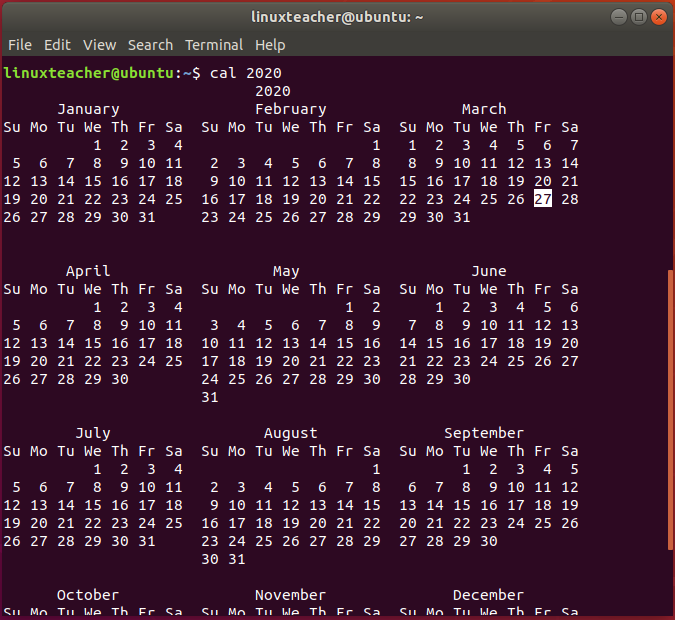
To display the calendar of the entire year run the command:
|
1 |
$ cal 2020 |
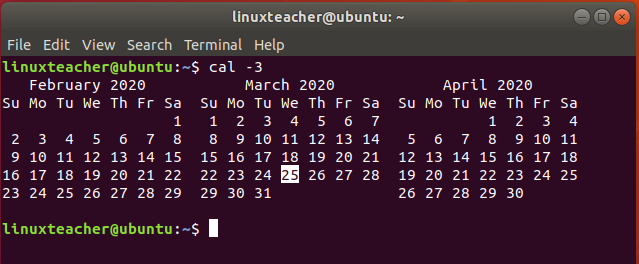
To display the calendar of the current, previous and next month, execute the command:
|
1 |
$ cal -3 |
6. free command
The free command prints RAM and swap utilization in the Linux system. For better output, use the -h option to print the statistics in a human-readable format.
|
1 |
$ free -h |

7. df / du command
The df command, short for disk free, displays the amount of available disk space on various partitions on a Linux system. For better output use the -Th option to print the statistics in a human-readable format.
|
1 |
$ df -Th |

The du command, short for disk usage, displays the disk usage of a folder or directory.
|
1 |
$ du /path/to/directory |

8. whoami / users / w command
The whoami command prints out or displays the current user who’s working on the terminal:
|
1 |
$ whoami |

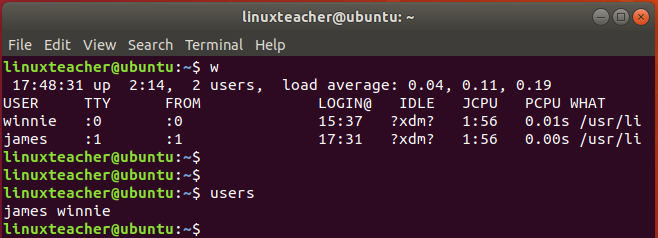
To print out logged in users use the w or the users command as shown
|
1 |
$ users |
File ownership/permissions
1. chown command
Other times, you may need to alter the file permissions of a file or directory. To change file permissions, use the chown command, an abbreviation for change owner. It allows you to change user or group ownership of a file or a directory. The syntax is shown below:
|
1 |
$ chown USER:GROUP FILE(s) |
To change ownership in directories, use the -R option for the permissions to apply recursively. In the example below, we have set the permissions of the reports directory to the linuxteacher user and linuxteacher group.
|
1 |
$ chown -R linuxteacher:linuxteacher reports |

2. chmod command
To change file permissions, use the chmod command. The basic syntax is shown below:
|
1 |
$ chmod options permissions filename |
Permission can be represented in 2 ways: octal format or alphabetical characters:
- Octal values ( From 0 to 7 )
- Alphabetical characters ( u for user, g for group , o for others).
Permissions are represented as r for read, w for write and x for execute.
- r=4
- w=2
- x=1
- 0 stands for no permission
For example, to assign read, write and execute permissions to the user of a file, and read and execute only to both group and others execute:
|
1 |
$ chmod u=rwx, g=rx, o=rx filename |
OR
|
1 |
$ chmod 755 filename |
For directories, use the -R option for the permissions to apply recursively just like in chown command:
|
1 |
sudo chmod -R 755 /var/www/joomla |

Network commands
Let’s now have a peek at some of the basic network commands that can come in handy and help you troubleshoot a few network issues.
1. ifconfig command
The ifconfig command prints out the IP addresses of your network interfaces as shown. It’s a handy command when you want to know your system’s IP address.
|
1 |
$ ifconfig |

2. ping command
The ping command is used to test the reachability of a server or a host over a TCP/IP network. The general syntax is:
|
1 |
$ ping IP address or hostname |
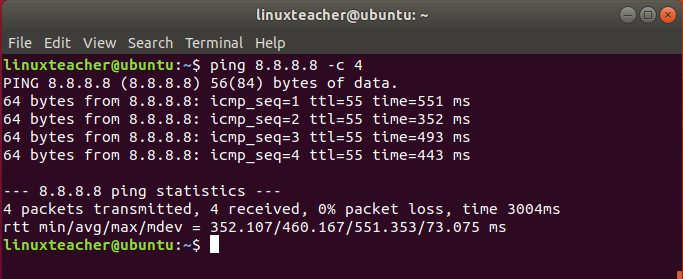
When used as it is, ping will send ICMP ping packets without stopping. As a good practice use the -c option and send the number of times to send the packets. In the example below, the ping command sends the packets 4 times to Google’s DNS and then stops.
|
1 |
$ ping 8.8.8.8 -c 4 |
3. nslookup command
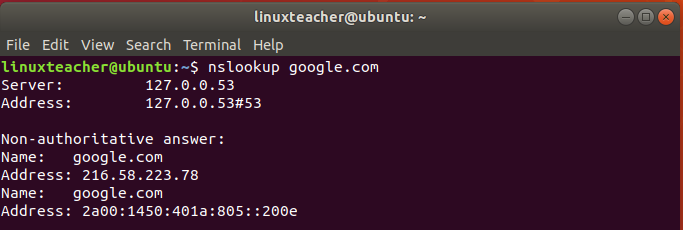
If you want to query the domain name of a server or host, use the nslookup command. The nslookup command is a network command-line tool used for retrieving records associated with a domain name such as IP address that is mapped to the domain name.
|
1 |
$ nslookup hostname |
3. dig command
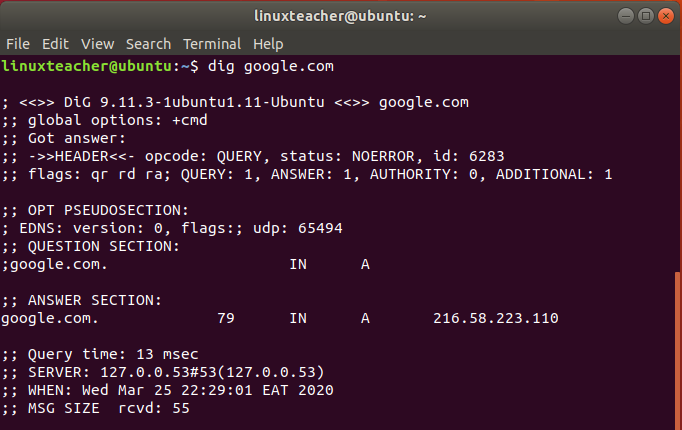
An abbreviation for Domain information Groper, dig command is used for querying the DNS name servers for more detailed information such as host addresses, name servers, and mail exchanges.
|
1 |
$ dig hostname |
Process Management commands
It’s crucial for any Linux user to know which processes are running on their system. Let’s have a look at some of the basic commands of Linux that give you a glance at the running processes:
1. Top command
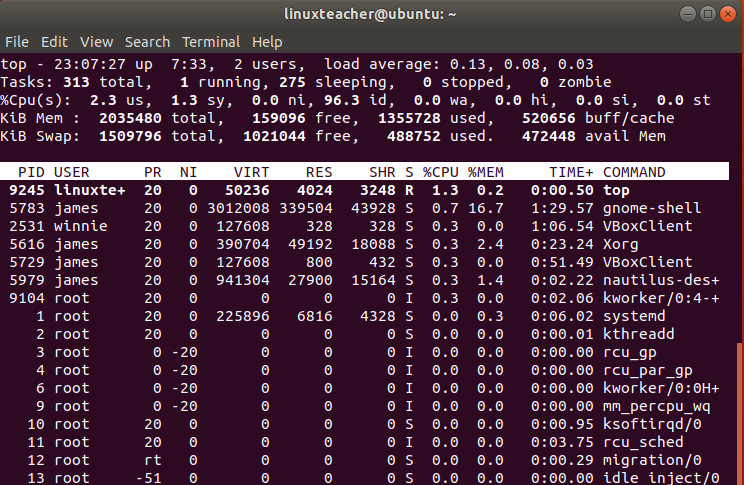
Top command is a utility tool that not only displays the running processes but also gives insights about the uptime, load average, and free memory.
|
1 |
$ top |
2. ps command
The ps command, short for process command, is another tool that is used for displaying current running processes. The basic ps command simply displays processes initiated by the current terminal session.
|
1 |
$ ps |

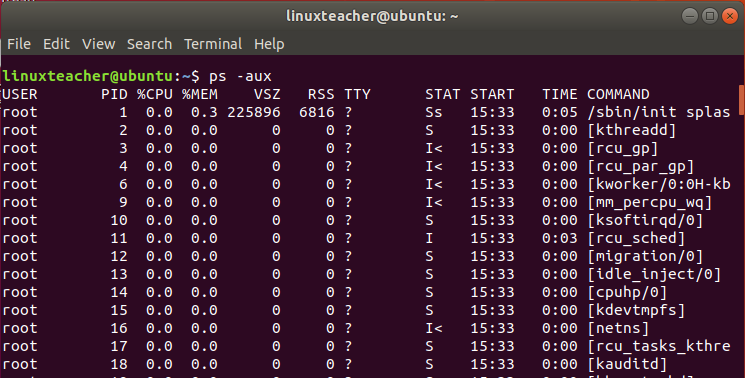
The command can also be used with a variety of options, for instance, the -aux option displays all the running processes alongside memory & CPU utilization and the duration the processes have been running.
|
1 |
$ ps -aux |
3. kill command
The kill command is used for terminating a running process. You can terminate a process using its name or PID (process ID).
To kill a process using its PID run:
|
1 |
$ kill -9 PID |
To kill a process e.g Firefox using its name run:
|
1 |
$ killall firefox |
Commands for compressing and decompressing files
There are 2 commonly used command-line tools used for compressing and decompressing files.
- tar
- zip / unzip
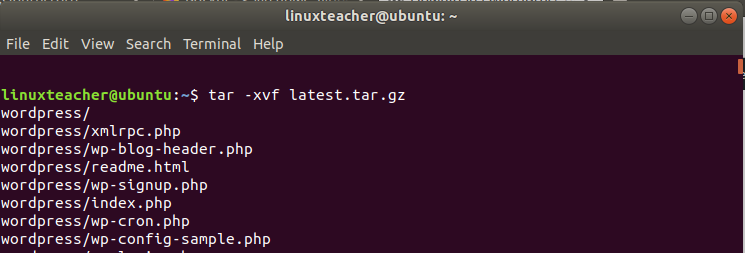
The tar command-line tool works with tarball files. It is used to compress and uncompress a wide array of tar archives such as .tar, .tar.bz2, .tar.gz and so many more. To untar or uncompress/extract a tar archive, use tar -xvf followed by the tarball file.
For example to extract a tarball file called ‘latest.tar.gz’, execute the command:
|
1 |
$ tar -xvf latest.tar.gz |
To view the contents of a tarball file, use the -tvf option.
|
1 |
$ tar -tvf filename |

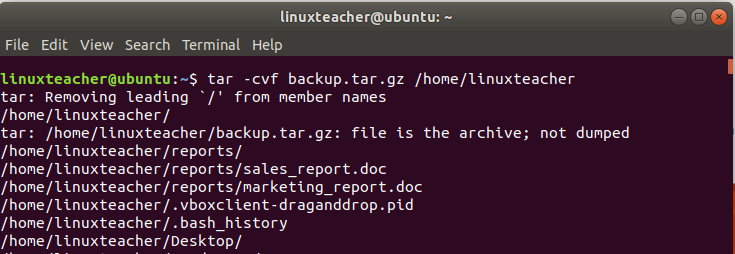
To create a tar archive, use the tar -cvf command followed by the name of the tarball file followed by the path of the directory you want to compress.
For example, to create a backup of your home directory as a tarball file called backup.tar.gz execute the command
|
1 |
$ tar backup.tar.gz /home/linuxteacher |
To unzip a zipped file, use the syntax
|
1 |
$ sudo unzip zipped file |

To zip a file, specify the name you want to give tp the zipped file followed by the name of the file being zipped. For example, to zip a file called download into download.zip, run:
|
1 |
$ sudo zip download.zip |

Commands for searching files
1. grep command
If you want to search a file in a directory, use the ls command and pipe the results into grep command followed by the file you want to search.
For example, to search for the file owncloud in /var/www/html/ run:
|
1 |
$ ls /var/www/html | grep owncloud |
2. locate command
Locate command is a command used to search for a file anywhere in the system beginning with the root directory. It’s super fast and finds files in no time. To search for a file, simply type:
|
1 |
$ locate filename |
3. whereis command
The whereis command is used for locating the source of a binary or source file of a Linux command including the manual sections (man pages).
For example, to find the location of cp command run the command
|
1 |
$ whereis cp |

4. which command
The Linux which command is a simple yet effective command used for locating executable binaries associated with a given command.
For example, to locate the executable binary associated with reboot command, run
|
1 |
$ which reboot |

5. zgrep command
zgrep command is a command that displays the contents of a compressed file without the need of extracting it. It comes in handy with zipped files and allows you to search for instances of occurrence of a certain word.
For example, to display lines containing the word ‘Linux‘ on a zipped file ‘introduction.gz‘ run the command:
|
1 |
$ zgrep "Linux" introduction.gz |

You can use the -i option to ignore case sensitivity :
|
1 |
$ zgrep -i "Linux" introduction.gz |

Use the -c option to count lines containing the search keyword
|
1 |
$ zgrep -c "Linux" introduction.gz |

To display the line not containing the keyword use the -v option
|
1 |
$ zgrep -v "Linux" introduction.gz |

5. zcat command
zcat command displays all the contents of a compressed file. For example, to view the contents of the previous file, run the command:
|
1 |
$ zcat introduction.gz |

Also, you can view multiple files in one line by listing the files in a single command in the example shown below
|
1 |
$ zcat introduction.gz getting_started.gz |

Few Other useful commands of Linux
To wrap up, we are going to look at some other useful basic commands of Linux which you require for convenience.
1. Clear command
This is a command useful to clear the terminal screen when it is full of commands and their output.
2. Ctrl + C / Ctrl + Z
Ctrl + C is a command used to terminate a command on the terminal safely. If you are having any issues stopping a command, then Ctrl + Z is gong to force stop it.
3. stat command
The stat command displays inode information which contains metadata about a file. This includes the name of the file, file size in bytes, blocks, file type, IO block, Inode number, links, uid, gid, file permissions in octal format, and access timestamp to mention a few. It’s a refined version of the ls command.

4. sudo / su
Sudo command allows a regular user who has administrative privileges to execute system-related tasks like he/she were the root user. All a user needs to do is invoke sudo before running the command. Thereafter, the user will be prompted for their password to continue executing the task.
For example, to update Ubuntu as a regular user, you will execute:
|
1 |
$ sudo apt-get update |
On the other hand, the su command allows a regular user to switch to the root user entirely. Simply type ‘su’ on the terminal and specify the root user’s password and hit ENTER to become the root user.
5. reboot / poweroff
As the name suggests, reboot command restarts the system and poweroff shuts down the system completely.
6. vim command
Vim (Vi Improved) is a command-line tool that is used for opening and editing text files. It’s an improved version os Vi text editor. There are a multiple of options that we shall cover later but for now, Let’s have a look at the very basic:
a) Opening a file
To open a file simply type vim followed by the file name
|
1 |
$ vim file1.txt |
b) Editing a file
Once you’ve opened the file, place the cursor to the point you want to start entering text using the arrow keys and hit the letter ‘i’ on the keyboard.
Also, to start typing text one character ahead of the cursor, press the letter ‘a‘
c) Saving a file
Once you are done editing a file, press the ESC key and type a full colon then followed by wq! and hit ENTER to save and quit the editor.
|
1 |
wq:! |
7. man command
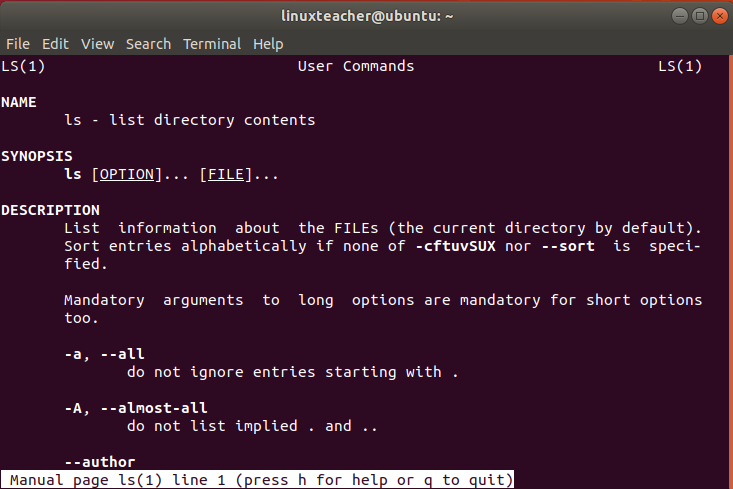
Man, short for manual pages, displays the user manual or usage of any command in Linux. It gives a brief explanation of the command and how it can be used alongside various options/parameters.
For example, to check the man page for ls command, run
|
1 |
$ man ls |
And there you have it. We have covered the top 50 basic commands of Linux and provided examples of how they can be used. There are lots of other Linux commands but we have covered the very basic to help you get started with Linux.
-

 DevOps6 years ago
Saltstack Tutorial for beginners [2025]
-

 DevOps6 years ago
How to build a Docker cron job Container easily [2025]
-

 Linux7 years ago
mail Command in Linux/Unix with 10+ Examples [2025]
-

 DevOps6 years ago
Docker ADD vs COPY vs VOLUME – [2025]
-
 DevOps6 years ago
How to setup Pritunl VPN on AWS to Access Servers
-

 Linux7 years ago
Grep Command In Unix/Linux with 25+ Examples [2025]
-

 Linux7 years ago
Find command in Unix/Linux with 30+ Examples [2025]
-
Linux5 years ago
How To setup Django with Postgres, Nginx, and Gunicorn on Ubuntu 20.04

